August 25, 2010
Fat Quarters - It's Not About Dieting
I'd seen these cutesy little folds of fabric in the store. Clearly just a little fabric - neatly folded and labeled "fat quarter." I looked at these snips and wondered about it. I looked at the prices of these bits and just couldn't imagine why anybody would pay so much for so little.
I didn't understand - but I get it now.
If you buy fabric from a bolt, you always tell the clerk how much you want (yards or meters). If you say "I'd like a quarter meter of this", the clerk will measure 1/4 meter along the edge of the fabric and cut from there. You get a longish strip that is quite narrow.
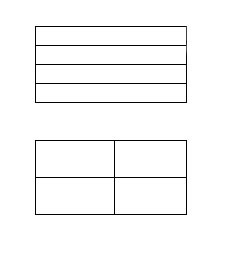
With a "fat quarter", however, what they do is cut a half meter from the bolt and then slice down the middle of that so that you end up with a wider piece (as opposed to a thin strip).
The diagram below shows 2 ways of cutting a piece into fourths. The top one shows the thin 1/4 strips. The second one shows the cutting layout of a "fat quarter." The area of each cut is the same - but with fat quarters you have more options, especially if you happen to be working with a fabric that has a large print.
To further illustrate, have a look at this bit of fabric that I found on a "clearance" table at one of my favorite fabric stores:
As you can see, if a quarter meter (or yard) of this were cut straight across, you'd surely not get any of the full blocks of roses in the piece. But with a "fat quarter", you'd get a good bit of the design, probably 4 or more of the rose groupings.
So much for the technical explanation. In my next post I will share with you the madness that gets into your blood once you understand the idea behind "fat quarters" (and "fat eighths", for that matter).
August 18, 2010
Stitching Templates
For my first project my quilt stitches were very simple - they just followed the stitching lines for the blocks. Now I'm well into my 2nd project - and so far I've done the same - just stitching about a half inch or so from the seams - straight lines and squares.
Time to branch out a little and try something new.
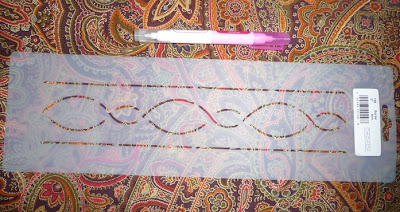
I wanted to have a slightly "swirly" stitching design on my second quilt, so I decided to try using a stitching template. Here's the one I chose:
Time to branch out a little and try something new.
I wanted to have a slightly "swirly" stitching design on my second quilt, so I decided to try using a stitching template. Here's the one I chose:
The template gives for continuous lines - 2 of them weaving back and forth together with the other (outer) 2 forming a straight border. The pen shown with it draws a thin pink line - which disappears after about 24 hours (sooner if the air is very dry).
And here's what the stitches look like (the back of Quilt 2: Ohio Star):
I'm very pleased with the results. The stitching goes quickly because you don't have to stop and start - it's just 4 continuous lines (which, of course, I did using 4 different needles so I could do them all at once).
August 11, 2010
You Can't Quilt with an IV Drip in Your Hand
Dr. Jane (gynaecological oncologist) and Dr. Suzanne (breast oncologist) put their heads together and decided that my remaining ovary should be taken out as a precaution. Having passed the great threshold of menopause a couple of years ago, I figured this was a pretty good idea - that ovary wasn't doing me any good and had, in fact, become trouble waiting to happen (esp. with the kind of sneaky "silent" breast cancer I've got). Dr. Jane figured she could get it via laparoscopy, so the surgery was scheduled for a Friday afternoon and away I went - expecting almost inconsequential incisions, only an overnight stay in hospital, and a speedy recovery period (like 2 weeks). I was pleased with all this, knowing that pesky ovary would be gone and it could all be done without impacting my mastectomy/reconstruction surgery dates.
It all sounded good on paper, anyway.
When I awoke in post-op I learned that they'd been unable to complete the planned ovary removal with a simple laparoscopy. They'd quickly discovered a nasty problem - adhesions (scar tissue) had made a twisted mess of my lower abdomen, looping around my digestive tract, basically a nasty, complex bowel-obstruction-in-the-making. The laparoscopy was scrapped and instead a much more involved operation was performed.
It was disappointing, of course, but I have to say that I felt pretty darned lucky. Had they not found this problem now, it would certainly have caused big trouble somewhere down the line.
So instead of an overnight stay, I was told to expect 5-7 days in hospital. I hadn't expected it, or prepared for it, but I DID have a smallish quilting project to work on (and a newly started crochet project), so I figured I'd at least be able to make good use of the time.
The first 36 hours or so, I had a self-administered morphine injector wired into one of the 3 IV taps attached to my left arm. Even in my drug-enduced euphoria I was aware that morphine and quilting would probably not make good bed-fellows, so I waited until I didn't need the heavy drugs anymore before trying anything.
Once the drug fog cleared, I pulled out the crochet project to see how that would go, figuring it would be easier to work on that the quilt would be. I made an attempt - but quickly realized that the IV in the back of my hand just wasn't "happy" if I tried to do much that required moving fingers a bit - that plus I kept bumping it - even with just crochet (which is easier to manipulate than a quilt).
I finally gave up.
The IV drips stayed in until the day before I was released. I was bummed - thinking about how I'd be returning in a few weeks time for the mastectomy, knowing in advance that I'd be unable to use my hands at all again. But, fortunately, I talked to one of the night nurses about my worries about that upcoming surgery. The nurse (a lovely woman whose name I don't now recall) sat down with me for about a half hour and explained in great detail what would happen in hospital after the mastectomy/reconstruction. I was THRILLED to learn that they take the IV drip out in about 24 hours after the surgery.
So there you are... come the next round of hospital-time, I have hope that I'll be able to quilt a little, or at least crochet.
YAY!
August 4, 2010
Quilt 5: Design
Ok...Ok.. you are right... I just finished quilt 3 - now starting quilt 5. What happened to number 4? Well...
Number 4 is a bedspread sized quilt. Don't worry. We'll get to it. In the short-term, however, I need smaller projects that won't be too demanding on my arms and pectoral muscles as I am recovering from the mastectomy/reconstruction surgery. Quilt 5 is a small quilt - similar in size to number 3.
Here's the design:
It's a log cabin design using navy, turquoise, green, yellow. The backing will be solid teal cotton and the binding will be solid navy.
This project is different because instead of starting with the design first (safest way to go) I opted to start with the fabric. You see... there was a quilting shop in Ferntree Gully that closed down - and they had a "closing down" clearance sale. I stopped in to see what bits I might find. I fell in love with the speckled fabric (shown in the photo below, under the stack of folded fabric) and picked up "fat quarters" (the folded fabrics) that coordinate with it. Then I came home and played with my quilt-design software to come up with a design that would suit the bits I picked up.
This is, of course, my first log cabin quilt. I'm surprised at how complex log cabins actually are to put together. They sure look simple. Seems you should be able to just zip together strips without any measuring...
WRONG!
WRONG!
You really have to be on your toes when you cut out the pieces for log cabins - they are all the same width, but there are 5 different lengths in the simple block shown below:
Ok... let's do the math:
30 log cabin blocks x 9 pieces per block: 270 pieces
between-block borders: 29 pieces
outer borders: 4 pieces
303 pieces! (this doesn't include the binding and backing)
Somehow it didn't seem like that many pieces as I was cutting it out and sewing it.
Subscribe to:
Posts (Atom)