Christmas looms.
I'm having a ball, but simply finding it too difficult to spend time here at the moment - so I'm going to take a break now and will be back on the first Wednesday of 2011 with fresh material.
Until then - Merry Christmas - and may you have a happy, quilty New Year!
December 15, 2010
December 7, 2010
The Australian Citizenship Test (Test Anxiety)
Four years ago I came to Australia (from the US) as an immigrant. I was granted permanent residence and on November 12th (the anniversary of my arrival as an immigrant) I became eligible to apply for citizenship.
In the months leading up to this I have reflected many times about what citizenship means, what I feel for my native country and what I feel for Australia. At the end of the day I find that taking this step is the most natural thing in the world. It's time for me to stop talking about Australians as "they" and start saying "us" instead.
Becoming a citizen involves three steps:
- Submitting an application (and documentation to prove identity and legal residence)
- Passing a "citizenship test"
- Participating in a formal citizenship ceremony
The first step I completed on November 12. Easy to do that, really, as much of it involves answering a few simple questions about yourself and getting certified copies of birth/divorce/marriage documents (for identification purposes).
The third step will be an absolute delight. I understand that the ceremonies are lovely and meaningful.
But that second step... oh my...
Let me say right now that I have never had trouble with "test anxiety." I graduated from high school, attended universities (and graduated with a bachelors degree and an MBA). I don't recall ever being freaked out over an exam before. But this is different.
The Australian government makes it pretty easy for you to prepare for this. There is a pre-test study guide available which covers all the information required. I downloaded a copy and started a regime of reading bits of it every day. At first I was OK with it all, but starting about two weeks ago the anxiety started building. What if I flunked the test? It happens, I understand. Not a lot, but sometimes. Oh heavens... what if I flunked?
I received a letter from the citizenship office informing me that December 7th would be my testing date. That was y'day (for those of you confused about how December 7th could be yesterday... well... this blog is hosted in the US and I'm in Australia... so a post set to publish on Dec 7th posts on Dec. 8th in Australia... we're 16 hours ahead of the US).
I arrived at the building about 10 minutes ahead of the scheduled time. The letter I had received instructed me to go to the testing office on the 2nd floor. Entering the ground floor of the large office complex I saw the very well-marked reception area for "Immigrant and Citizenship Reception." There was a huge line of people in the "reception line" just inside the doors, so I got my place in line and waited. The line was moving very slowly. I started looking around and began to wonder if I was in the right place. My letter had specifically said to go the the 2nd floor - this was the ground floor. Getting more nervous, I pulled my cellphone out and rang the citizenship office and asked them about the exact location. The woman who answered my call confessed she had no idea because she is in Sydney - but her coworker (who had worked in the Melbourne office) might know... so I waited as she asked the coworker. Sure enough the coworker confirmed that I should find "the elevator" and go to the 2nd floor.
OK. I get out of the line and walk past the reception area - looking for an elevator. No elevator. Luckily there was a woman at a desk who was not engaged with a client, so I asked her for directions. She told me to go back out to the street and go into the building via a completely different door. I did as she told me, found the elevators, and headed to the 2nd floor. When I stepped off the elevator I saw lighted professional signs for professional offices, but nothing saying "citizenship". I was sure I was in the wrong place again, so I turned to go back to the elevator. That is when I spotted an 8x10 paper "sign" (looked like it had been made on someone's home computer) taped to the wall beside one of the elevators saying "Citizenship" and pointing down the hall.
Greatly relieved, I headed in the direction of the arrow and found the office I was looking for.
There was one rather young-looking man working the reception desk. He was helping someone else, so I stood behind him. After 15 minutes there was a line of 6 other people behind me also waiting. Finally a second assistant came up and said "I'll help whoever is next". She asked me the reason for my visit, looked at my letter, checked on the computer to verify I had an appointment, and gave me a slip of paper with "T033" printed on it and said I should have a seat.
It took a while, but as I sat there waiting I became more and more calm about it all. (Now... I have to laugh... there was a TV in the waiting area showing an old rerun of "Gilligans Island." Very, VERY weird and surreal feeling to be waiting to be interviewed for Australian citizenship and watching Gilligan and the Skipper arguing.) By the time I was called to be "interviewed", I felt like I had both feet on the ground. The woman who took my papers and processed them was very pleasant - we chatted amiably and I started to feel really good.
Then the moment came - she took me into the testing room, sat me down in front of a computer terminal and started the test for me. I'd have 45 minutes to finish. No worries. I was done in 7 minutes.
The questions I was so worried about were, well, not so bad. I did miss one question - but because I'd studied so hard the others were a breeze.
And so there you are. I'm done with the test. Now I have to wait for the gov't authority to contact me and let me know which citizenship ceremony I will be scheduled to participate in.
Can't wait!
And I'm hoping it will happen on Australia Day.
(Side note: I've talked about this for years, told all my friends. I'm so surprised at how many of my US friends think I have to give up my US citizenship to do this. No... I don't. I will have dual citizenship, which is legally allowed by both Australia and the US.)
December 1, 2010
Quilt ?: Disaster City
What was I thinking?
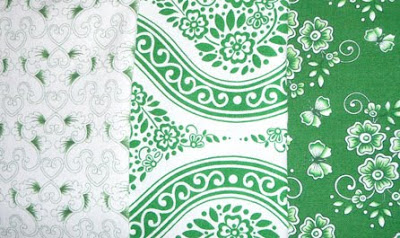
I found these 3 adorable green-and-white prints and thought they looked fabulous together:

I played around with my quilt design software and came up with this design:

And gleefully went about cutting the bits and pieces out. I pieced together the first block for the top and... oh... disasterous. That center print (the swirls and flowers) looks just awful in the design. The print is too large for the small triangles that go on the outside of the dark green blocks. The overall design disappears and looks like a blob.
Well... I could show you a photo, I guess, but it's too depressing. It really looks horrid.
Had I done a simple strip quilt it would have been OK. And I think it would have been OK if I'd had that center fabric surrounded by the dark green. But sandwiching it between the dark and light prints - AND making the bits so small, well... awful.
What I'll need to do is find something else - a much smaller print - to replace the blocks for those triangles.
For the moment, though, I'm just depressed about this and have shoved all the pieces into a plastic bag and pushed them to the back of my UFO closet.
November 24, 2010
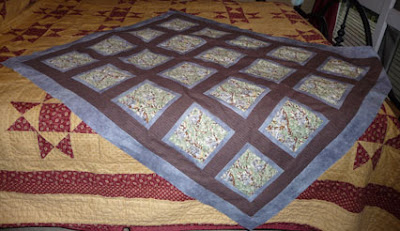
Quilt 7: Design and Piecing the Top
Quilt 6 is done, Quilt 5 is well on it's way, time to get some more of my UFO's put together so that I don't end up with a bad case of NTQ (Nuthin Ta Quilt). So here we go, Quilt 7! This one will be a baby quilt, made up using a sweet koala print. Here's the design:
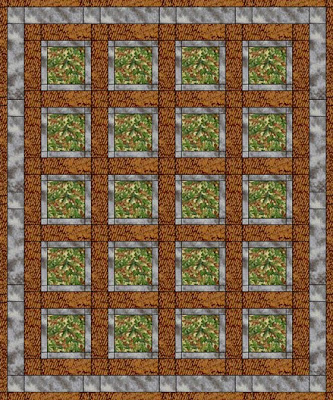
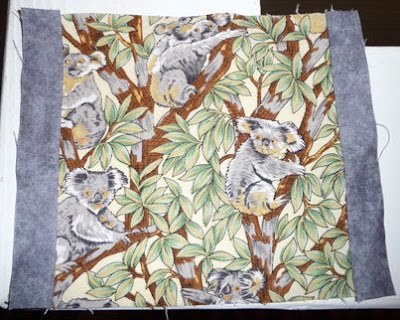
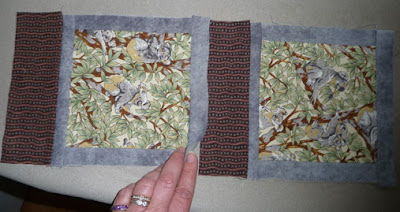
It's a very simple design, just 20 main blocks with a bit of sashing around them. The green-and-brown squares will be where the koala print goes. Each koala square will have a half-inch "frame" of grey:

I cut out several one-inch strips of grey and sewed them on the sides of the koala blocks:
Then I stitched strips to the tops and bottoms, completing the "frames" for the koalas.

The koala "frame" blocks will be seperated by 2 inch "sashing" - and I'm for that I'm using an interesting aboriginal style print. I sew a strip of this sashing on the bottom of each koala block. Just as I did with my log cabin (Quilt 6), I'm not bothering to cut the sashing until AFTER I've sewn it to the block:
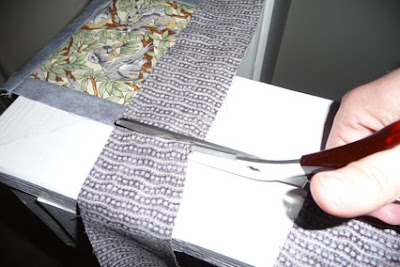
That makes it all go a lot faster.
The sashing fabric is a brown aboriginal print. It's very attractive, perfectly compliments the colours in the koala fabric, and looks a bit like bark - so I'm going to make sure that the lines in the sashing fabric run vertically (to maximize the bark-like effect).
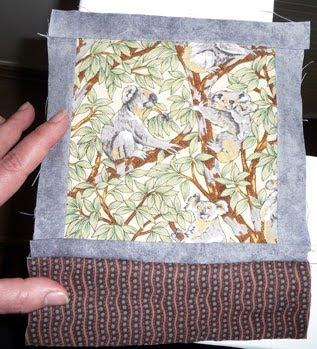
and then put the sets together to form a strip of koala blocks. It's important that the koala's are all going in the same direction (a one-way print). By sewing the horizontal sashing only on the bottom of the koala blocks, I eliminated the chance that I'd get them turned to the side or upside down.
...and now the vertical strips are done.
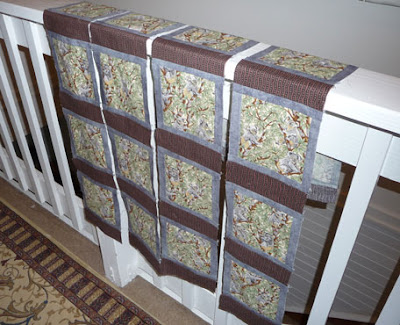
Now ready for the vertical sashing. And as a last step, added a 2-inch border of grey:
Done! From start to finish, it took just 5 hours to get this much done.
I would have liked the grey border to be wider, but if I'd done that, it would have been too wide for the special "baby quilt batting" that I bought. The batting is 45x60 (inches), so I was somewhat limited by that. Still - it's a good size for the purpose.
All ready to make up the "sandwich" and then the quilting can begin.

It's a very simple design, just 20 main blocks with a bit of sashing around them. The green-and-brown squares will be where the koala print goes. Each koala square will have a half-inch "frame" of grey:

I cut out several one-inch strips of grey and sewed them on the sides of the koala blocks:

Then I stitched strips to the tops and bottoms, completing the "frames" for the koalas.

The koala "frame" blocks will be seperated by 2 inch "sashing" - and I'm for that I'm using an interesting aboriginal style print. I sew a strip of this sashing on the bottom of each koala block. Just as I did with my log cabin (Quilt 6), I'm not bothering to cut the sashing until AFTER I've sewn it to the block:

That makes it all go a lot faster.
The sashing fabric is a brown aboriginal print. It's very attractive, perfectly compliments the colours in the koala fabric, and looks a bit like bark - so I'm going to make sure that the lines in the sashing fabric run vertically (to maximize the bark-like effect).

and then put the sets together to form a strip of koala blocks. It's important that the koala's are all going in the same direction (a one-way print). By sewing the horizontal sashing only on the bottom of the koala blocks, I eliminated the chance that I'd get them turned to the side or upside down.

...and now the vertical strips are done.

Now ready for the vertical sashing. And as a last step, added a 2-inch border of grey:

Done! From start to finish, it took just 5 hours to get this much done.
I would have liked the grey border to be wider, but if I'd done that, it would have been too wide for the special "baby quilt batting" that I bought. The batting is 45x60 (inches), so I was somewhat limited by that. Still - it's a good size for the purpose.
All ready to make up the "sandwich" and then the quilting can begin.
November 17, 2010
Advance Australia Fair
Going "off topic" again for a moment...
I came to Australia 4 years ago as an immigrant. I'm so glad I had this opportunity and am very grateful to the many wonderful people who have been so kind, helping me along the way. I'd like to name them all here, but there are too many to name. And not just my beautiful Australian family and friends, but those back in Ohio who supported my decision (even though they didn't really understand).
And - as of November 12, I became eligible to apply for citizenship. I took that step on the day. There's a citizenship test I have to pass (and I'm studying hard) and then waiting to be notified when and where I will participate in a citizenship ceremony.
And so, one day in 2011, I will stand with other immigrants, recite the words:
"From this time forward, under God,
I pledge my loyalty to Australia and its people,
whose democratic beliefs I share,
whose rights and liberties I respect, and
whose laws I will uphold and obey."
and sing our anthem:
"Australians all let us rejoice
For we are young and free..."
(As a side note - my love for Australia in no way diminishes my love of the United States. In becoming an Australian citizen, I will retain my American citizenship, which I am able to do legally under the laws of both countries.)
November 10, 2010
Guilty Quilty Secrets - Part 2
True confessions...
Last week I let you have a little look inside my UFO closet. And I admitted to you then that there was more. Well... here we go:
I love these fresh white-and-green "Irish" prints. There's enough here for a baby quilt. Very bright and cheery.
The Craft Connection was a lovely store in Ferntree Gully that has, unfortunately, closed (the owner retired). My first trip there was my last, sadly. But when I was there I found this sweet koala print and bought enough for a baby quilt:

And here's a dangerous bit of madness: a single "fat quarter" of a gorgeous gum tree print:
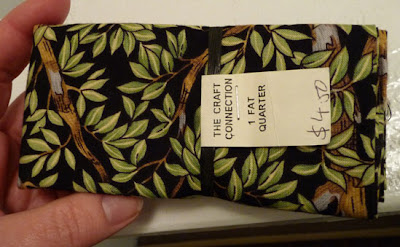
It's madness because there was only this fat quarter, nothing that really went with it. It's dangerous because you can BET that I'll find something to go with it... ...and the hunt for that coordinating fabric will, of course, lead to other bits that will attract me.
Oh, I'm just a moth drawn to the flame...
Last week I let you have a little look inside my UFO closet. And I admitted to you then that there was more. Well... here we go:
I love these fresh white-and-green "Irish" prints. There's enough here for a baby quilt. Very bright and cheery.

The Craft Connection was a lovely store in Ferntree Gully that has, unfortunately, closed (the owner retired). My first trip there was my last, sadly. But when I was there I found this sweet koala print and bought enough for a baby quilt:

And here's a dangerous bit of madness: a single "fat quarter" of a gorgeous gum tree print:

It's madness because there was only this fat quarter, nothing that really went with it. It's dangerous because you can BET that I'll find something to go with it... ...and the hunt for that coordinating fabric will, of course, lead to other bits that will attract me.
Oh, I'm just a moth drawn to the flame...
November 3, 2010
Guilty Quilty Secrets - Part 1
OK. I've been holding out on you. I'd apologize but I'm sure you'd know that I'm not really sorry, just feeling a little guilty.
I've been teasing friend Pauline about her huge stack of UFO's. But the truth is that I don't have much room to talk. My stash is growing, too. As a matter of fact, I've cleared out a large space in my linen closet just to store the batting and uncut fabric for projects that may not see daylight for some time.
And, just so those UFO's don't get lonely, I've been shopping again and picked up a few new bits:
First - I found the cutest koala print at my favorite quitling store - and a couple of bits (the grey and brown on the left) to go with it. This will be another medium-sized throw quilt:


The photo doesn't show it well, but the dragons have sparkly gold on their feet, heads, and spine. The colours are just so rich. I bought a meter of this, not wanting to wait and then go back only to find that the fabric has sold out. I'm sure I'll be able to find bits later that match and coordinate. In the meantime I'll see what kind of design I can come up with to maximize those glorious dragons.
And there's this bit (below):
This print I've had for a little over a year. I bought 3 meters, thinking I'd make a summer garment for myself, but just never got around to it. Then a couple of weeks ago my friend Karleen showed me a small decorative quilt she'd bought - her quilt had some of this fabric in it! She said she wanted to make some pillows to go with it, and I offered her a meter of this (her pillows look simply gorgeous covered in this - really sets off the quilt!). So I've still got 2 meters, certainly plenty to for a quilt.
So... is that all? (sheepish grin here...) Uh... No... There's more...
(I'll tell you about that next week)
I've been teasing friend Pauline about her huge stack of UFO's. But the truth is that I don't have much room to talk. My stash is growing, too. As a matter of fact, I've cleared out a large space in my linen closet just to store the batting and uncut fabric for projects that may not see daylight for some time.
And, just so those UFO's don't get lonely, I've been shopping again and picked up a few new bits:
First - I found the cutest koala print at my favorite quitling store - and a couple of bits (the grey and brown on the left) to go with it. This will be another medium-sized throw quilt:

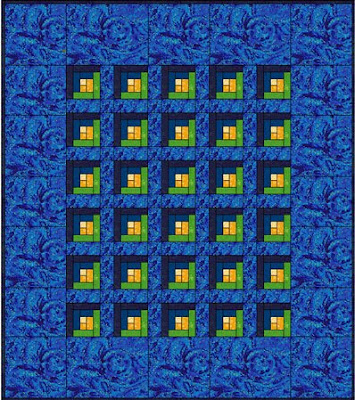
And while I was in the store, saw a quilt kit that I fell in love with - "Forbidden Palace":
The picture (above) isn't terribly good. Have a look here at the picture on the "Patchwork with Gail B" website. The design is gorgeous - simple rectangular "snowball" blocks. Each rectangular block has a small triangle of black on the corner which frames the block and creates a stained-glass window effect. The simple black cotton runs around the edge, with matching binding. It's very dramatic.
I just love the Japanese prints that make up the blocks. Here's a few of the prints that come with the kit (there are 80 different prints in this quilt... EIGHTY! ):
Gorgeous!
And right next to the sample quilt, I found this Asian print:

The photo doesn't show it well, but the dragons have sparkly gold on their feet, heads, and spine. The colours are just so rich. I bought a meter of this, not wanting to wait and then go back only to find that the fabric has sold out. I'm sure I'll be able to find bits later that match and coordinate. In the meantime I'll see what kind of design I can come up with to maximize those glorious dragons.
And there's this bit (below):

This print I've had for a little over a year. I bought 3 meters, thinking I'd make a summer garment for myself, but just never got around to it. Then a couple of weeks ago my friend Karleen showed me a small decorative quilt she'd bought - her quilt had some of this fabric in it! She said she wanted to make some pillows to go with it, and I offered her a meter of this (her pillows look simply gorgeous covered in this - really sets off the quilt!). So I've still got 2 meters, certainly plenty to for a quilt.
So... is that all? (sheepish grin here...) Uh... No... There's more...
(I'll tell you about that next week)
October 27, 2010
....Taking a Break
I'm afraid the time got away from me this week and I didn't prepare a blog post for this week. But I've been busy - got a few things to tell you about. I'll do that next week. See you then.
:-)
:-)
October 20, 2010
Quilt 6: Design
Well.. as I've actually nearly finished quilt 6 - plus talked about it in my previous post, I guess I should introduce the design. (I'm sure you've realized by now that I am just not doing these projects in sequence...)
So here it is: the design for Quilt 6:

And here's the top after it was pieced together:
And here's the detail of the top:

So here it is: the design for Quilt 6:

And here's the top after it was pieced together:

And here's the detail of the top:

This top went together in a FLASH. I think I spent about 5 hours total on it!
This one went with me to the hospital when I had my mastectomy and first step of reconstruction. I really had expected to be able to work on it - but, well, that didn't go as planned.
No matter. I've been working on it since. The quilting is done, the binding has been tacked on, the edges trimmed, and now I'm stitching the binding down - will probably finish it tonight!
October 13, 2010
Log Cabin Lesson
When I cut out my first log cabin project (Quilt Number 5), I found it really complicated. Cutting all those little pieces, each with varying lengths, and having to be careful not to cut the pieces too small, matching the colors carefully and so on.
But then it hit me: For the log cabin blocks I was doing, the width of the blocks was the same, only the length was different! Why bother to cut the different lengths? Why not just cut strips of the appropriate width, sew the bits and then trim?
OF COURSE!
So I started Quilt Number 6 by cutting out the first 2 blocks (both were 2x2) and stitched them together like this:
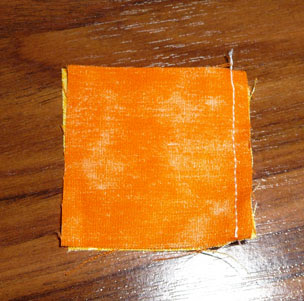
Then I opened them up and placed them (right side down) onto a strip and sewed them to the strip like this:

Then I cut the strip:

Then opened up the beginning of the block:
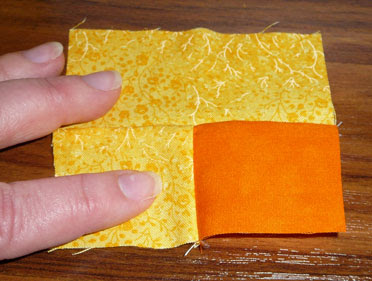
The orange square is the center of the block - so next I will pick up a strip of the color I want on the right side and sew along that edge.
Simple, easy, and FAST!
I didn't even bother to press the seams before going on to the next strip.
I'm delighted with the result. The blocks are perfectly uniform and even lay more flat after pressing than the ones in Quilt 5 do.
October 6, 2010
Breast Cancer: 2 - Quilting Hoop: 4
They caught my cancer early, really early. In opting to have a bilateral mastectomy, I not only was able to deal with that cancer but pretty much stomp on my risk of a repeat. My risk for recurrance is now something less than 5%. All this without chemo or radiation therapy. So my cancer is gone and, as my beloved cousin Beth (who went through this 3 years ago - but had to have chemo) points out: I get to keep my hair.
I'm healing well from my surgeries, but have been terrifically uncomfortable. At the time of my mastectomy, my plastic surgeon installed "expanders" under my pectoral muscles. The purpose of these devices is to gradually stretch my muscle and skin, making way for a full-sized permanent silicone gel implant later on. The expanders are, well, uncomfortable. At times VERY uncomfortable. But just the other day my surgeon put in more saline in them (causing me to inflate a bit) and now they don't bug me quite as much.
And I've gone from being a smallish "B" cup to a "very full C." Feeling pretty good, so I think it's time for therapy.
Not chemo therapy.
Not radiation therapy.
Not psychotherapy.
Retail Therapy!
I've been steadily working on my "recouperation projects" and am getting to the place where I need to set up something to work on when they are done. Yup. Time to get the design software out and then do some shopping.
I haven't been in my favorite quilting store since July. I know they've missed me....
September 29, 2010
Quilt 5: Design Error + Awkward Solution
Quilt 5 is my first "fat quarter" project. I bought the fabric without having a design in mind - and (more importantly) without having measurements in-hand.
I found a lovely calico of a teal background with splashes of yellow, green, and navy. Just luscous. There was only a couple of meters on the bolt, so I bought it all, figuring any scraps would surely come in handy some day. Then I selected fat quarters (and fat eighths) to compliment it. Came home, whipped up a log cabin design - but quickly realized that the quarters/eighths I'd bought were not really going to give me large (or even medium) log cabin blocks.
Here are the quarters as they looked before cutting (and the background fabric).

Hm...
I want a quilt "throw" for the lounge - something large enough to tuck under my feet and still pull up to my chin. Not a bedspread certainly, but a quilt large enough to curl up under at night.
(OK... Now let's get REAL here... I'm NEVER going to curl up under this quilt... because I'm ALWAYS going to have another quilt on my lap - one that I'm actively quilting...).
Anyway... once I got the logcabin blocks together I realized that the overall size of the quilt was going to be smaller than desired.
How to add inches to it? Well... of course... I did it wrong. Oh, Pauline, where were you when I needed you? (Pauline is a good friend and my quilting guru, so naturally I'm going to blame my mistakes on her).
Here's the original design:

Here's what I did with it:
I found a lovely calico of a teal background with splashes of yellow, green, and navy. Just luscous. There was only a couple of meters on the bolt, so I bought it all, figuring any scraps would surely come in handy some day. Then I selected fat quarters (and fat eighths) to compliment it. Came home, whipped up a log cabin design - but quickly realized that the quarters/eighths I'd bought were not really going to give me large (or even medium) log cabin blocks.
Here are the quarters as they looked before cutting (and the background fabric).

Hm...
I want a quilt "throw" for the lounge - something large enough to tuck under my feet and still pull up to my chin. Not a bedspread certainly, but a quilt large enough to curl up under at night.
(OK... Now let's get REAL here... I'm NEVER going to curl up under this quilt... because I'm ALWAYS going to have another quilt on my lap - one that I'm actively quilting...).
Anyway... once I got the logcabin blocks together I realized that the overall size of the quilt was going to be smaller than desired.
How to add inches to it? Well... of course... I did it wrong. Oh, Pauline, where were you when I needed you? (Pauline is a good friend and my quilting guru, so naturally I'm going to blame my mistakes on her).
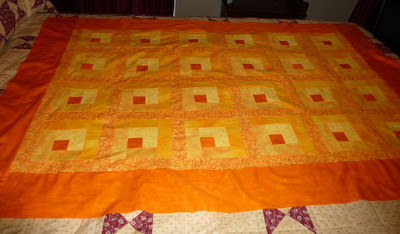
Here's the original design:

Here's what I did with it:

What I SHOULD have done is make the sashing between the blocks bigger than originally planned. That would have spaced the blocks more, but it would have looked better than what I actually did.
I made the outer border panel bigger - a LOT bigger.
Yes, I did model it first with my quilting software (as you can see above). It looked, well, OK there. But the actual quilt just looks awkward - the huge border overwhelming the much smaller log cabin blocks.
As I've said before: "I'm not a perfectionist."
Pauline (being the artist she is) would probably pull this apart and fix it properly. Me? Nah. FULL SPEED AHEAD!
September 22, 2010
Breast Cancer: 2 - Quilting Hoop: 2
This past week has brought some improvements. I'm now 8 weeks out from the abdominal surgery, 5 weeks out from the mastectomy/recon surgery - still terribly sore and pretty dogonned frustrated with it all.
But, finally, I'm finding that I'm able to do a little quilting. Finally.
It's lovely. Evenings in the loungeroom now include some TV (or more often, a DVD), a nice fire in the wood burner, bright lights and my quilt project.
So I'm giving the quilting hoop 2 points. It deserves them. It has been patient, even though I have been less so.
September 15, 2010
Breast Cancer: 2 - Quilting Hoop: 0
OK. Another week has gone by and although I can tell the swelling under my arms is starting to go down, it's still not possible to sit and quilt comfortably. I've tried various sitting/reclining positions and so on.
Nope.
No good.
How long can this go on? Grrrrrrrrrrr!
Nope.
No good.
How long can this go on? Grrrrrrrrrrr!
September 8, 2010
Breast Cancer: 1 - Quilting Hoop: 0
This is not going to go down as one of the more "fun" periods of my life. That said, it's also not the worst, either, not even close. But it's been unpleasant enough.
As part of my preparation for my bilateral ("double") mastectomy I pieced and pinned a couple of smallish projects, thinking it would be nice to have something I could quilt during recovery.
Well... it was a nice thought.
With surgery number one I found that I couldn't quilt because of the IV drip in my left hand. Once that was out, however, I was able to get back to it. Before going in for the breast surgery I asked how long the IV would be in. "24 hours" was the answer I got. HEY! HURRAY! Good news, that! I'd be in the hospital for a total of 5 days - but no problem, folks... only the first 24 hours would see me wired up with an IV. So I packed a quilt project in my hospital bag.
What I hadn't counted on was the swelling under my armpits. My cousin Beth (who went through this 3 years ago) mentioned the swelling at one point - but I didn't realize how uncomfortable that was going to make me. The swelling isn't actually tender anymore (it was at first) but it DOES prevent me from positioning my arms comfortably.
So here I sit - unable to quilt - at least for now.
September 1, 2010
Fat Quarters - The Devil Made Me Do It...
In a previous post I explained the technical idea of "fat quarters." Now I'll describe the deviously planned impact these little innocent-looking bits have.
It's brilliant marketing. Brilliant.
Quilting calico runs between $15 to $25 a meter. The cost of a quilt, therefore, is just astronomical. When you lay out a new design and think "yardage", you reel at the hit your pocketbook is going to take. When you go into the store to look for, say 2 meters of something, you pick up a heavy bolt. You then have to wander around with this massive roll of fabric and look for something to coordinate with it. You are aware of the weight. You are aware of the cost.
Fat quarters, however, are small - easy to pick up, easy to pair up with other little fat quarters, and much less expensive. Once you figure out that you can grab a few "fat quarters" (at $4 to $7 a pop) and make something, well... you get suckered in.
The quilt shops all put their fat quarters right in the center of the store. It's the same devilry that causes grocery stores to position the lollies directly across from the breakfast cereals. They know they have you. You'll walk in with every intention of picking up that inexpensive meter from the "clearance table" - but you have to walk past the fat quarter table to get there.
Yeah... they know what they are doing.
You walk up to the table (no... you are pulled... it's a magnetic force... BEWARE). You spot the edge of something pretty - something unusual. Orange and gold dragonflies on a field of navy (no! impossible! how can it be so pretty?!?!?!) You extract it from the mass of neatly tucked-in folds of similar size. You look at it and think "oh! I wonder what I might use this for..." And you can't help but look to see what might coordinate. The next thing you know, you're designing (mentally) a work of art large enough to cover the Vatican.
I watched friend Pauline hit the FQ table the first time she took me to what is now my favorite quilting shop. She walked around the perimiter, of course, first looking at the bolts of fabric. She found some lovely lavender calico and bought enough for a single-sized coverlet. She thought that would save her. Wrong! The overpowering tractor beam of the FQ table pulled her in. And after about half an hour she was caught - a moth to the flame. I watched as she sorted through hundreds - literally HUNDREDS of fabric swatches. Matching, discarding this, picking up that. Pauline is an artist. She has a fabulous eye for finding interesting coordinating bits. In about 40 minutes she assembled a stack of quarters - browns and burnished coppers - that looked as if the good Lord Himself must've intended those bits to be together in a harmonious rhapsody of color and pattern. Delicious. But I saw how MANY of these quarters she had. Most were over $5 a unit - and she had something like 20 units.
And of course, being a good friend, I did what any other girlfriend would do. "GO FOR IT!" I said "Gorgeous! Yeah! Do it, Pauline!"
Sorry. No self-restraint possible in a quilting store.
I escaped the magnetism of the evil FQ table that day. But only about 4 weeks later I found myself in another quilt shop - one that was closing down and had excellent "everything must go" prices. I'd intended - yes actually intended - to buy some quarters to make a quilt. I did that. But also came out with enough bits (totally different color/pattern) to make a 2nd quilt top.
As I write this I am planning another trip to the quilt shop. I want to pick out some fabric to use in making table runners and other smallish projects that I can work on while I recover from my upcoming cancer surgeries. I know that the fat quarter table is a good place to start. Logically it should turn out well. But... will I be able to walk out with only the items I plan to?
Doubt it.
August 25, 2010
Fat Quarters - It's Not About Dieting
I'd seen these cutesy little folds of fabric in the store. Clearly just a little fabric - neatly folded and labeled "fat quarter." I looked at these snips and wondered about it. I looked at the prices of these bits and just couldn't imagine why anybody would pay so much for so little.
I didn't understand - but I get it now.
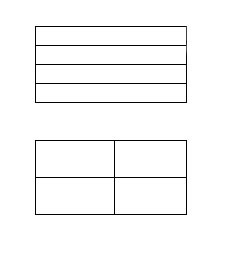
If you buy fabric from a bolt, you always tell the clerk how much you want (yards or meters). If you say "I'd like a quarter meter of this", the clerk will measure 1/4 meter along the edge of the fabric and cut from there. You get a longish strip that is quite narrow.
With a "fat quarter", however, what they do is cut a half meter from the bolt and then slice down the middle of that so that you end up with a wider piece (as opposed to a thin strip).
The diagram below shows 2 ways of cutting a piece into fourths. The top one shows the thin 1/4 strips. The second one shows the cutting layout of a "fat quarter." The area of each cut is the same - but with fat quarters you have more options, especially if you happen to be working with a fabric that has a large print.
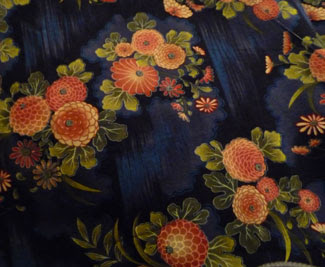
To further illustrate, have a look at this bit of fabric that I found on a "clearance" table at one of my favorite fabric stores:
As you can see, if a quarter meter (or yard) of this were cut straight across, you'd surely not get any of the full blocks of roses in the piece. But with a "fat quarter", you'd get a good bit of the design, probably 4 or more of the rose groupings.
So much for the technical explanation. In my next post I will share with you the madness that gets into your blood once you understand the idea behind "fat quarters" (and "fat eighths", for that matter).
I didn't understand - but I get it now.
If you buy fabric from a bolt, you always tell the clerk how much you want (yards or meters). If you say "I'd like a quarter meter of this", the clerk will measure 1/4 meter along the edge of the fabric and cut from there. You get a longish strip that is quite narrow.
With a "fat quarter", however, what they do is cut a half meter from the bolt and then slice down the middle of that so that you end up with a wider piece (as opposed to a thin strip).
The diagram below shows 2 ways of cutting a piece into fourths. The top one shows the thin 1/4 strips. The second one shows the cutting layout of a "fat quarter." The area of each cut is the same - but with fat quarters you have more options, especially if you happen to be working with a fabric that has a large print.

To further illustrate, have a look at this bit of fabric that I found on a "clearance" table at one of my favorite fabric stores:

As you can see, if a quarter meter (or yard) of this were cut straight across, you'd surely not get any of the full blocks of roses in the piece. But with a "fat quarter", you'd get a good bit of the design, probably 4 or more of the rose groupings.
So much for the technical explanation. In my next post I will share with you the madness that gets into your blood once you understand the idea behind "fat quarters" (and "fat eighths", for that matter).
August 18, 2010
Stitching Templates
For my first project my quilt stitches were very simple - they just followed the stitching lines for the blocks. Now I'm well into my 2nd project - and so far I've done the same - just stitching about a half inch or so from the seams - straight lines and squares.
Time to branch out a little and try something new.
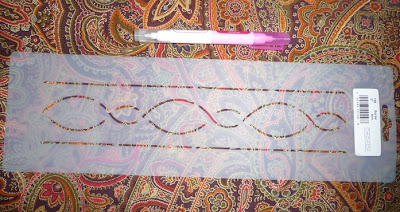
I wanted to have a slightly "swirly" stitching design on my second quilt, so I decided to try using a stitching template. Here's the one I chose:
Time to branch out a little and try something new.
I wanted to have a slightly "swirly" stitching design on my second quilt, so I decided to try using a stitching template. Here's the one I chose:

The template gives for continuous lines - 2 of them weaving back and forth together with the other (outer) 2 forming a straight border. The pen shown with it draws a thin pink line - which disappears after about 24 hours (sooner if the air is very dry).
And here's what the stitches look like (the back of Quilt 2: Ohio Star):
I'm very pleased with the results. The stitching goes quickly because you don't have to stop and start - it's just 4 continuous lines (which, of course, I did using 4 different needles so I could do them all at once).
August 11, 2010
You Can't Quilt with an IV Drip in Your Hand
Dr. Jane (gynaecological oncologist) and Dr. Suzanne (breast oncologist) put their heads together and decided that my remaining ovary should be taken out as a precaution. Having passed the great threshold of menopause a couple of years ago, I figured this was a pretty good idea - that ovary wasn't doing me any good and had, in fact, become trouble waiting to happen (esp. with the kind of sneaky "silent" breast cancer I've got). Dr. Jane figured she could get it via laparoscopy, so the surgery was scheduled for a Friday afternoon and away I went - expecting almost inconsequential incisions, only an overnight stay in hospital, and a speedy recovery period (like 2 weeks). I was pleased with all this, knowing that pesky ovary would be gone and it could all be done without impacting my mastectomy/reconstruction surgery dates.
It all sounded good on paper, anyway.
When I awoke in post-op I learned that they'd been unable to complete the planned ovary removal with a simple laparoscopy. They'd quickly discovered a nasty problem - adhesions (scar tissue) had made a twisted mess of my lower abdomen, looping around my digestive tract, basically a nasty, complex bowel-obstruction-in-the-making. The laparoscopy was scrapped and instead a much more involved operation was performed.
It was disappointing, of course, but I have to say that I felt pretty darned lucky. Had they not found this problem now, it would certainly have caused big trouble somewhere down the line.
So instead of an overnight stay, I was told to expect 5-7 days in hospital. I hadn't expected it, or prepared for it, but I DID have a smallish quilting project to work on (and a newly started crochet project), so I figured I'd at least be able to make good use of the time.
The first 36 hours or so, I had a self-administered morphine injector wired into one of the 3 IV taps attached to my left arm. Even in my drug-enduced euphoria I was aware that morphine and quilting would probably not make good bed-fellows, so I waited until I didn't need the heavy drugs anymore before trying anything.
Once the drug fog cleared, I pulled out the crochet project to see how that would go, figuring it would be easier to work on that the quilt would be. I made an attempt - but quickly realized that the IV in the back of my hand just wasn't "happy" if I tried to do much that required moving fingers a bit - that plus I kept bumping it - even with just crochet (which is easier to manipulate than a quilt).
I finally gave up.
The IV drips stayed in until the day before I was released. I was bummed - thinking about how I'd be returning in a few weeks time for the mastectomy, knowing in advance that I'd be unable to use my hands at all again. But, fortunately, I talked to one of the night nurses about my worries about that upcoming surgery. The nurse (a lovely woman whose name I don't now recall) sat down with me for about a half hour and explained in great detail what would happen in hospital after the mastectomy/reconstruction. I was THRILLED to learn that they take the IV drip out in about 24 hours after the surgery.
So there you are... come the next round of hospital-time, I have hope that I'll be able to quilt a little, or at least crochet.
YAY!
August 4, 2010
Quilt 5: Design
Ok...Ok.. you are right... I just finished quilt 3 - now starting quilt 5. What happened to number 4? Well...
Number 4 is a bedspread sized quilt. Don't worry. We'll get to it. In the short-term, however, I need smaller projects that won't be too demanding on my arms and pectoral muscles as I am recovering from the mastectomy/reconstruction surgery. Quilt 5 is a small quilt - similar in size to number 3.
Here's the design:
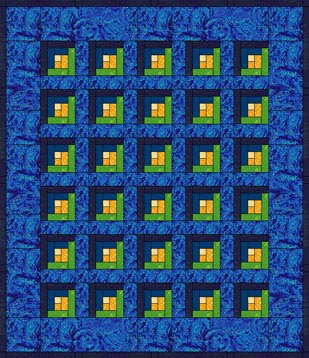
It's a log cabin design using navy, turquoise, green, yellow. The backing will be solid teal cotton and the binding will be solid navy.
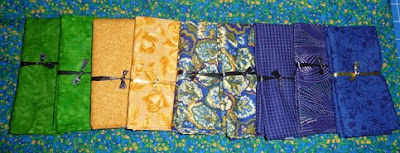
This project is different because instead of starting with the design first (safest way to go) I opted to start with the fabric. You see... there was a quilting shop in Ferntree Gully that closed down - and they had a "closing down" clearance sale. I stopped in to see what bits I might find. I fell in love with the speckled fabric (shown in the photo below, under the stack of folded fabric) and picked up "fat quarters" (the folded fabrics) that coordinate with it. Then I came home and played with my quilt-design software to come up with a design that would suit the bits I picked up.

It would be incredibly easy to mess it up.
Number 4 is a bedspread sized quilt. Don't worry. We'll get to it. In the short-term, however, I need smaller projects that won't be too demanding on my arms and pectoral muscles as I am recovering from the mastectomy/reconstruction surgery. Quilt 5 is a small quilt - similar in size to number 3.
Here's the design:

It's a log cabin design using navy, turquoise, green, yellow. The backing will be solid teal cotton and the binding will be solid navy.
This project is different because instead of starting with the design first (safest way to go) I opted to start with the fabric. You see... there was a quilting shop in Ferntree Gully that closed down - and they had a "closing down" clearance sale. I stopped in to see what bits I might find. I fell in love with the speckled fabric (shown in the photo below, under the stack of folded fabric) and picked up "fat quarters" (the folded fabrics) that coordinate with it. Then I came home and played with my quilt-design software to come up with a design that would suit the bits I picked up.

This is, of course, my first log cabin quilt. I'm surprised at how complex log cabins actually are to put together. They sure look simple. Seems you should be able to just zip together strips without any measuring...
WRONG!
WRONG!
You really have to be on your toes when you cut out the pieces for log cabins - they are all the same width, but there are 5 different lengths in the simple block shown below:

It would be incredibly easy to mess it up.
Ok... let's do the math:
30 log cabin blocks x 9 pieces per block: 270 pieces
between-block borders: 29 pieces
outer borders: 4 pieces
303 pieces! (this doesn't include the binding and backing)
Somehow it didn't seem like that many pieces as I was cutting it out and sewing it.
Somehow it didn't seem like that many pieces as I was cutting it out and sewing it.
July 28, 2010
Quilting as a Cure for Cancer
I got lucky. They caught my cancer early.
It could easily have gone un-noticed. But Dr. Suzanne, my surgeon, found it and so now we're preparing for multiple rounds of surgery. Because of my history of developing cysts, my age, and the kind of cancer they found ("silent cancer" - a type that can be seen only with an MRI or in tissue removed by a surgical biopsy), we are opting for a double mastectomy and the removal of my remaining ovary for the safety and peace of mind these procedures will give me. This seems a bit radical until you understand that I've had 11 biopsies in about a year (new cysts developing continually) and since they can't explain why this is happening, there's no way to stop it. And you really can't afford to ignore cysts - especially since I have developed this sneaky bastard "Silent Cancer." So it's either get a mastectomy or move in with Dr. Suzanne and get an MRI done about every other week.
She tells me that the cancer is small, early. With a mastectomy at this stage, no chemo or radiation will be necessary. So, yes, I'm counting my blessings.
My mother found breast cancer and underwent a double mastectomy last year - at the age of 80. Her cancer was much more advanced than mine and she had to endure chemo - and losing her hair. Just try and imagine that. At the age of 80. Lordy. She decided against reconstruction, having recently been widowed and wanting so much to put it all behind her. I remember her telling me how she'd worried about pain only to be pleasantly surprised at how much better she felt than anticipated. I've heard the same story from other cancer survivors who opted to skip reconstruction.
With reconstruction, however, the stories are a bit different. My beloved Cousin Beth (who went through this 3 years ago) tells me that she found it pretty darned uncomfortable, but not "unbearable." Knowing her experience is comforting because what I'm reading about the experiences of other women, well... it's unsettling.
But I'm only 54. And I'm happily married to a man whom I often describe (with much justification) as "a prince." I want to have breasts, even if they aren't "real" like the ones I was born with. So, OK. It's gonna hurt for a while. But I want breasts.
I'm preparing for a post-operative experience which may include periods when moving my arms and lifting even light things is difficult.
Still.. must quilt... must quilt...
I look at my stash of projects and calculate. I'll need some small projects. Table runners, maybe placemats, maybe a baby quilt or two. Things that don't demand a lot from my arms and pectoral muscles.
I don't know what kind of discomfort I'm going to face with my reconstruction but I do know this: I have simply GOT to be able to continue quilting.
I must have my "drug of choice" (a sandwich of fabric and batting, needle and thread).
So off I go now - back to the fabric stores and quilting shops. Looking at fat quarters, tossing together some designs, and so on. I'll be a busy girl for a couple of weeks as I await my surgery date. I'm busy now designing, buying, cutting, piecing, and sandwiching. My goal is to have at least 4 smallish projects ready for stitching when I enter the hospital, maybe a couple of medium-sized ones for the days when I'm stronger but still not really able to drive.
No, quilting will not cure cancer. But it might just keep me from dying of boredom.
So me and my quilting hoop - we're gonna kick cancer's BUTT!
July 21, 2010
Quilt 3: FINISHED!
What's that you say? How could I possibly have finished another quilt in only a week? Well... I started the 3rd quilt some time ago and have been alternately working on number 2 and number 3.
Here's quilt 3:
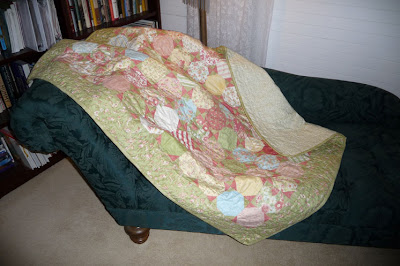
This one is not my own design - it's a kit that I bought at "Patchwork With Gail B." It's a small "throw" size quilt, not a bedspread. I had a ball putting it together and making it up - especially since I intended from the start to give it to my very dear friend Julie B. as a special birthday present.
Let's do the math:
99 "snowball" blocks made up of 5 pieces each: 495 pieces
boarder: 4 pieces
499 pieces! (Not including the binding and backing.)
I learned a couple of things as a result of this quilt:
Here's quilt 3:

This one is not my own design - it's a kit that I bought at "Patchwork With Gail B." It's a small "throw" size quilt, not a bedspread. I had a ball putting it together and making it up - especially since I intended from the start to give it to my very dear friend Julie B. as a special birthday present.

Let's do the math:
99 "snowball" blocks made up of 5 pieces each: 495 pieces
boarder: 4 pieces
499 pieces! (Not including the binding and backing.)
I learned a couple of things as a result of this quilt:
- I really enjoy having projects of different sizes - and although this wasn't as challenging as a larger quilt, it was great to have something small enough to be really "portable." I took this one with me on the plane when hubby and I visited Aunt Sheila in Ballina. It fitted neatly into the suitcase and gave me a relaxing "something to do" in the hotel before going to bed.
- This is the second quilt that I've tried doing a patterned border stitch on. I found that with fabric prints this "busy" the fancier stitches can be waste of time. Simple straight lines would've made more sense. I quilted this with a cream cotton thread - and the stitches just don't show up much. The swirling pattern on the green border going around this quilt is virtually invisible.
July 14, 2010
Quilt 2: FINISHED!!!!
It's done! It's done! (insert trumpet fanfare - Tahn-tah-dah!)
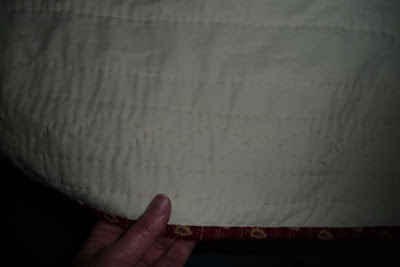
Here's the back (not much to look at, I agree):

And a closeup of the back stitching along the edge:
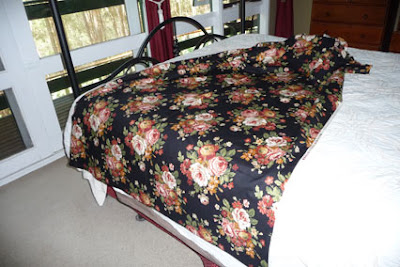
And the top. I'm thrilled to pieces. The bed is a queensize, but I made the quilt much larger than a queen (nearly king size) because I wanted the stars to hang over the sides and the drop to be a lot longer than you might usually have. That's because the mattress is one of those "latex" mattresses and it's very deep.

Here's another view - our bedroom is quite small but the floor-to-ceiling windows which make up the north-facing wall bring in a lot of light and the spectacular view of our Mountain Ash forest.
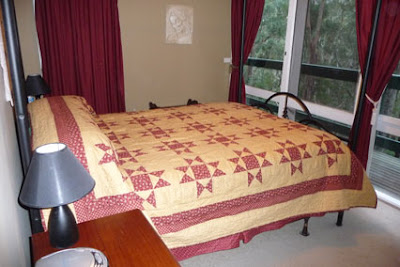
As you can see in these pictures, the "bed skirt" isn't long enough. I'm going to have to construct a new one with the appropriate length. I've not decided yet whether to make the skirt maroon/wine or gold.
July 7, 2010
It Was Bound To Happen
I'm close - really close - to being done with quilt number 2. Very exciting!
I decided to take a couple of photos of the soon-to-be-bound project and write a little blurb here about it. So I grabbed my camera and headed to the loungeroom, where my huge quilt project lay sprawling over the couch.
I took the photo - and just after doing that, realized I had a problem.
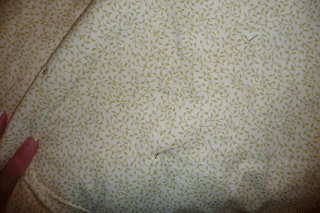
Here's the photo:
I decided to take a couple of photos of the soon-to-be-bound project and write a little blurb here about it. So I grabbed my camera and headed to the loungeroom, where my huge quilt project lay sprawling over the couch.
I took the photo - and just after doing that, realized I had a problem.
Here's the photo:

What's the problem? Well... just above my hand you can see the thread that I'm currently stitching into the quilt, right? Right. Can you see the needle? Hmmmmmmm?
When I finish stitching for the night, I weave the needle into the quilt so that it's held nice and tight - and will be easy to find the next day. But last night? Obviously I messed up - and the needle, left to it's own devices, has obviously chosen to go wandering.
I searched and searched through the folds of the top - feeling around, looking closely. No needle. My heart sank.
Maybe it was on the floor? Oh, no. It would be MOST unpleasant to find that needle with my feet (worse... what if I don't find it and hubby steps on it - YIKES!). Then I lifted the edge of the quilt and looked down at the seat. BINGO.


BIG sigh of relief!!!!
June 30, 2010
Crazy Little Thing Called....
...breast cancer.
OK. Have to confess I've been pre-occupied lately and although I've been quilting, haven't had the brain power to write about it. So no quilt talk today. Sorry.
Mom had it last year. Cousin Beth battled it 3 years ago. Cousin Toni - 5 years ago. Now it's my turn. This is a club I never wanted to join.
I have to admit that it's scary. Sometimes it overwhelms me. But, as wiser people than I have said: "Cancer is a word, not a sentence."
June 23, 2010
You Should See My Thumb
well... no you shouldn't.
It looks awful. Really awful.
I've got a metal thimble for my middle finger on my right (dominant) hand and I use that to push the needle through - but I keep pushing with my thumb, too, and it's unprotected. It's a little bit sore, too. I guess eventually my thumb will form a nice callous - but that probably won't look much better.
Yuck.
June 16, 2010
Quilt 4: Christmas Quilt - Design
First project (queen sized bedspread) is done. Second project (king-sized Ohio Star bedspread) is well on it's way. Third project ("lap quilt") is also well on it's way. And now...
(drumroll, please)
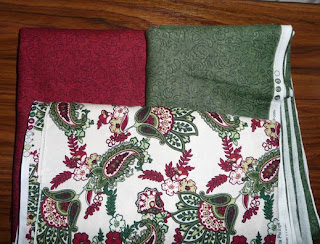
The fouth project - another bedspread, and this time a Christmas quilt! Here's the fabric:
I used "Quilt Design Wizard" computer software for the design but I know there is a "glitch" in the yardage calculations... so I did a second design for the middle lattice section using just plain blocks (not on point) so my yardage for the lattice isn't ridiculous.
(drumroll, please)
The fouth project - another bedspread, and this time a Christmas quilt! Here's the fabric:
I got the cream background fabric last January from Spotlight's clearance table. Something like $6 a meter - who could resist? The red and green fabrics came from "Patchwork With Gail B" and cost more, but certainly are worth the expense.
Here's the design:
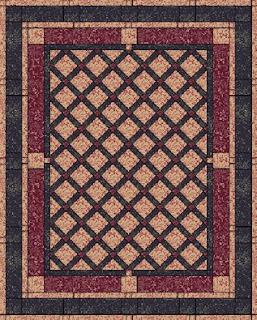
As you see, I'm going to try my hand at a lattice "on point" - but... I'm not actually doing those center blocks on the bias. No - they'll be cut with the grain, thus saving a lot of aggravation that comes from stitching on the bias (just about impossible not to stretch things out when piecing by machine).

As you see, I'm going to try my hand at a lattice "on point" - but... I'm not actually doing those center blocks on the bias. No - they'll be cut with the grain, thus saving a lot of aggravation that comes from stitching on the bias (just about impossible not to stretch things out when piecing by machine).
I used "Quilt Design Wizard" computer software for the design but I know there is a "glitch" in the yardage calculations... so I did a second design for the middle lattice section using just plain blocks (not on point) so my yardage for the lattice isn't ridiculous.
Fingers crossed and away I go!
June 9, 2010
Color Matching Tip From Pauline
My friend Pauline is a quilting genius!
She helped me select the colours for what will be my 4th project (a Christmas quilt). When we were at the store we looked and looked until my eyes were just wearing out. It was really hard to check the reds and greens - until Pauline told me about her little trick.
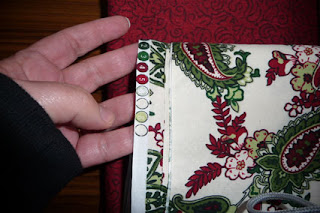
You see... I was trying to match a calico print that I'd already bought. I held up my roll of material to the bolts in the store and strained to see if the dyes matched well enough. Pauline pointed out the dye marks that fabric manufacturers put on the selvage (as you see above)
I was trying to find a match for the darkest green (the "number 2" colour dot). It was very hard to do from the design because the dark green on the print is so small. But the colour dot was a good size. It's a lot easier to match using those dots than trying to match the colours in the center of the fabric's design.
Thanks, Pauline!
June 6, 2010
Slowing Down Now - Priorities!
I started this blog back in April - posted nearly every day for a while. Then I cut back to twice weekly. But I'm finding that even twice weekly is a bit much, so I'm going to cut back again and just publish on Wednesdays. I'm enjoying writing this, but writing is cutting into my quilting time - and we can't have that! :-)
June 2, 2010
Quilt 3: Making the Sandwich
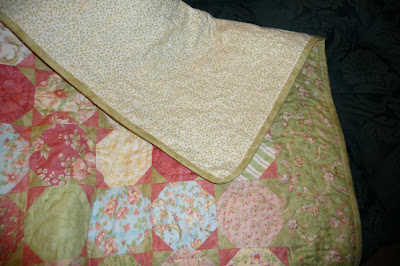
Here it is - the completed quilt top (plus border). I've spread it out on the floor so that I can lay the backing fabric over it to see if the backing is wide enough.
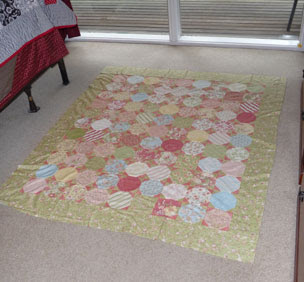
For tihs quilt I've chosen a printed calico as the backing (below) - cream and mossy green.
In the photo below I've spread the backing over the quilt top. As you can see on either side, the backing isn't quite wide enough. I'll have to add 3 inches to each side, and will do that by cutting from the excess backing material at the bottom.


And here we are.. pinnned and ready for stitching


For tihs quilt I've chosen a printed calico as the backing (below) - cream and mossy green.

In the photo below I've spread the backing over the quilt top. As you can see on either side, the backing isn't quite wide enough. I'll have to add 3 inches to each side, and will do that by cutting from the excess backing material at the bottom.

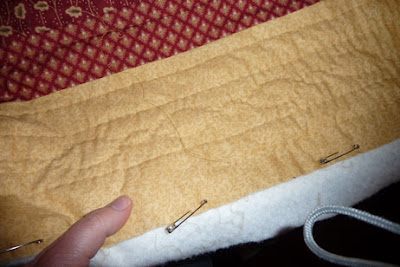
In the photo below I've placed the backing face down, the batting on top of that, and the quilt top last, facing up. Now I'm ready to pin. Notice the mass of fabric on the left. That's excess batting. I bought this batting from a roll and there's enough excess there to do another quilt this size! YAY! (project number 4?)

And here we are.. pinnned and ready for stitching

This one is small enough to squeeze into my suitcase when we go to visit Aunt Sheila.
Have small quilt; can travel.
Subscribe to:
Posts (Atom)
