Showing posts with label Charm Squares. Show all posts

August 5, 2020

Quilt 149: Oh Baby! Charm Squares On Point

My friend Suzanne just became a grandmother last week.  She's been so excited about this baby, and her joy is just contagious.  So of course I made a baby quilt for little "Violet".

I've made this simple, easy on-point design several times now.  Violet's mum is especially fond of grey and pink - and this charm square set has a couple of soft dove prints and lots of pink, so it was an obvious choice.

48" x 48" - bamboo batting - quilted on the longarm

The stitch pattern I selected for the quilting is a simple "bubble" pattern, and I used a dove-grey thread for the top and white thread in the bobbin (which fades nicely into the white-and-green printed backing fabric.
As Melbourne, Australia, is currently in "lockdown" due to the COVID-19 virus, I wasn't able to deliver the quilt in person (Suzanne lives about an hour's drive from my house), so I posted the quilt.

March 13, 2019

Quilt 145: Scrappy Charm Squares On Point - DONE!

One of my favorite designs for a crib-sized quilt is the one done with charm squares stitched together to form a 6x12 block rectangle, and then cut down and rotated to get the on-point effect.

Quilt 90 was the first one I made using the design (and on that post I showed how it's done - click here to see the post).  This is my fourth time making one of them.

This one is different in one respect:  It's made up entirely of charm squares that were left over from other projects!  Well, I love the economy of THAT!

And here it is:
48" x 48" - quilted on the Q-Matic (stitch design is "AJSPANTO15 Rose Blossom") - bamboo batting
 Not only are the squares leftovers, but the 2 borders on the top were made from leftovers.  Even the batting is made up of 2 offcuts from other projects, which I tacked together.

The stitching pattern I purchased from on the Urban Elementz website:
"AJSPANTO15 Rose Blossom"
Here's a closup of thetop, showing these gorgeous roses:
And here it is on the backing:
Another success!

February 24, 2019

Quilt 141: Moda "Sonnet Collection" Charm Squares - DONE!

Another charm square quilt!  This one is done with Moda's "Sonnet Collection" charm squares.  I love the rich tones, the creams, deep peachy orange, turquoise, green and browns.
I know I make a lot of these, but I so enjoy tossing them together.  The outer borders are from my scrap stash - how cool is that?!?!
48" x 62" - quilted on the Q-Matic - bamboo batting
Here's a closeup of some of the squares:
The quilting is done with soft grey thread.  I'm surprised, really, at how often grey is such a great choice.  It disappears in the print squares but shows up beautifully in the solid borders.

The stitch pattern is "Leafarama2" - one of the patterns which came with the Q-Matic.
The stitching shows up much better on the backing.
So there you are - another classic "simple squares" quilt.
s

February 17, 2019

Quilt 140: Sunflowers of Provence Charm Square - DONE!

Here's another charm square quilt, this time with Moda's "Sunflowers of Provence" collection:
(doublclick any photo on this page to see a larger image)
It's bright, cheery and loaded with flowers.  I do have to laugh, however - as I didn't spend enough time arranging the squares, and do you see the goofs here?  I've got all the stripes on the left, the whites and reds aren't evenly distributed.
46" x 57" - quilted on the Q-Matic ("Leafarama2" stitch design) - bamboo batting
Even so, it's still a very pretty quilt.

Here's the stitch pattern I selected:
I decided to be bold and opt for dark green thread, with a solid mustard backing.  I tend to go with light threads, but just wanted to see what it would look like with a bold dark colour.  It looks fine on the front - but the back is stunning!  Best of all, with the dense, dark quilting, the seam in the backing (a problem with solid backings that are pieced) pretty much fades from view.
What a great picnic quilt!

February 10, 2019

Quilt 138: Flight 1 - DONE!

As part of my New Years' resolutions, I vowed to make more quilts for boys (for donation to the charity "Inspirational Quilts").  I'm working on that now.

I found this set of charm squares at Gail B's not long ago.  All airplanes, stripes and dots:
 I decided to just do a plain rows-and-columns quilt for this one, wanting to whip it up fairly quickly.  Here I've got the squares laid out, ready to pin and start sewing.
And here's the finished quilt:
47" x 67" - quilted on the Bernina Q-Matic - bamboo batting
Here's the quilt stitch pattern I used:
 
And a closeup of the top showing the airplane prints:
 The backing is a soft navy - and I used light grey thread, which shows up beautifully on the back:
I really like this one - and when I was finishing it, my quilting guru Pauline sent me a message to let me know Gail B. had a sale on - so I ran out and grabbed a couple more packs of the same print while they were on sale.  Now I'm deciding whether to do another like this one or something different... hm....


February 3, 2019

Quilt 136 - Rainbow Pinwheels - DONE!

I'd had two sets of this charm pack for about a year.  I love the colours, but wasn't sure what I wanted to do with them:
 Half-square triangles to the rescue!  I framed them in a lattice of solid black homespun and then got somewhat stuck, wanting a couple of borders to extend the size of the quilt, but not sure what to put there.  I ended up with 2 shades of green and am very pleased with how it turned out.
55" x 65" - quilted on the Bernina Q-Matic - bamboo batting
 The Q-Matic didn't come with a stipping pattern that I liked - but I found this one from Urban Elementz:
I opted for a medium grey thread - which displays the quilting nicely but doesn't overwhelm or clash with any of the colours in the blocks.
Stippling is a great quilting pattern - it's incredibly versatile
 And here's a closeup of a couple of the blocks.
It turned out really well - very cheery and colourful!

January 30, 2019

Quilt 135 - Mini Squares - Peacock DONE!

Last year I purchased a quilt kit from Patchwork With Gail B.  I just loved the design of that quilt, and have set up to do several more of these, using different charm square designs.  This time I've used a charm square pack from Northcote called "Artisan Spirit- CSHIM42".  Here's a photo of the squares from the pack:
I'm taking photos with my phone, and it tends to distort colours.  The actual squares are considerably more "blue green" than the photos show.  The gold flecks on the squares are metallic - really rich texture and contrasting colour.

And here's the quilt finished:
65" x 65" - quilted on the Bernina Q-Matic with "Leaf Sashing 1" design - bamboo batting
 Here's the quilting pattern I selected:
And here's a closeup showing the stitching in the blocks.  The tan center blocks have a linen-look to them, very subdued, so the dense leaf quilting pattern works really well.
The backing is a soft gold and white flowery print.  The gold is in the same family as the linen-look blocks on the front, just a shade or two darker.

and the binding is solid teal homespun.

I really enjoyed making this - and every time I do one of these mini-square quilts I'm amazed at how fast it comes together.  There will be more!

December 26, 2018

Quilt 124: Green Batiks - DONE!

Of all the quilts I've done this year, one of my favorites was Quilt 119 - a kit from Patchwork With Gail B The kit is called "Nells Flower Shop", and I had a ball putting it together.  I found some charm squares online that I thought would make up beautifully with that pattern.These squares are from Robert Kaufman - and are all gorgeous green batik prints.

I found a soft minty green print to use in the main square blocks and border.  And here's the finished quilt:
(63" x 63" - quilted on the longarm Q-Matic - bamboo batting)
In the center of the squares, I quilted using a block pattern from the Q-Matic library:
Here's a photo of the stitch design (from the Q-Matic manual):
 On the 2 borders I used a meandering leaf pattern in two sizes (photo below):
And here's the leaf stitch design from the manual:

I just love how it turned out - going to make some more of these!

December 19, 2018

Quilt 123 Lecien Floral Collection baby quilt - DONE!

A while back I did an on-point baby quilt "Nana Mae".  Time to do another one!

This time I'm using Lecien's Floral Collection Pastel charm squares.
And here's the finished quilt!
46" x 46" - quilted on the Bernina Q-Matic - cotton batting

Here's the stitching pattern I used:
 And here's a closeup of the quilt showing how the pattern looks on the quilt.
 The backing and binding are done in a soft pastel pink print.

December 12, 2018

Quilt 122: "Faded Memories" (encore) - DONE!

Way back in 2010 I bought a quilt kit for Patchwork With Gail B (one of my favorite shops).  It was my 3rd quilt, and turned out fabulous.  (Click here to see my original post about that quilt).

Back last August, the shop had a big sale, and they even had those kits marked down!  I couldn't resist - figured it would be a good one to send on to Inspirational Quilts (a great charity).

The quilt is made from Moda's "Faded Memories" charm squares:
 And here's the prints that come in this pack.
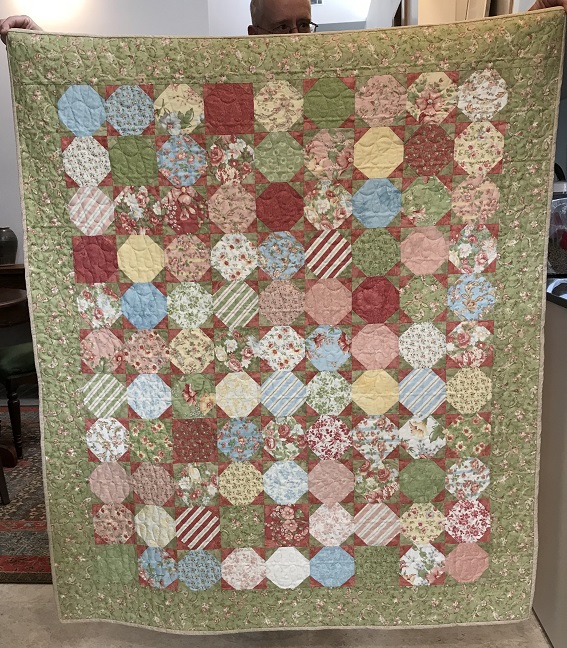
Thee quilt consists of simple "snowball" blocks with a border.

Here's a closeup of the blocks.  The "snowball" corners alternate dusty rose and grey green.  Very simple but also very effective.

I quilted it on the longarm using a simple "eternity" loop design.  Here's the backing, where it's easier to see the quilt pattern.
And here's the design (from the Q-Matic manual):
I loved doing this quilt again.  Even though there are over 500 pieces in the top, it was a fairly fast and satisfying project.  And the fact that it was "fast" tickles me a lot, because I remember spending hours and hours on it way back in 2010.  I guess I've come a long way in my 8 years of quilting - have learned a few things that reduces the amount of time it takes me to put a quilt together.

November 28, 2018

Quilt 120: Kaffe Classic Purple and Teal - DONE!

I love charm squares - and found this "Kaffe Classic" set from Rowan online.  The photo on the website where I ordered the fabric showed squares of purple, blue, teal, and greens.  I thought: "gorgeous"!
But - when I opened the charm pack, in with the lovely flower and polka dot prints, were some pretty wild ones that simply didn't marry well with the flowers and dots. There were quite a few of these:
I'm afraid my camera isn't doing well with the colours here, just trust me: They didn't match the other colours at all.  So I pulled them out and set them aside.

I arranged what was left:
 And inserted a 2/5" lattice and a healthy sized border on the left and right.  And here's the finished quilt!
48" x 66" - quilted on the longarm (Q-Matic "Bellflower2" design) - cotton batting
For the quiltinig, I chose the Q-Matic pattern "Bellflower2".  It's a fairly small, dense stitching pattern (if you don't resize it to a larger size, which I didn't).  With the quilt being the size it is, and the dense stitching, the Q-Matic gave me fits.  Apparently there is a definite limit to the number of total stitches it can handle.  So I had a fairly dense stitching pattern, a pretty good sized quilt, and also had the audacity to select 12 stitches to the inch.  I managed to get it done, but oh heavens!  I pretty much had to stitch one end-to-end row, stop and do a complete reboot of the system, then set up the quilt again each time I had another row to complete.  It drove me nuts.

After wrestling with it for several hours and observing the system's behaviour, it became apparent that the "realign safe area" function is where the problem is.  I don't know why the system doesn't just give you an error message.  Seems to me it should, but there you are.

Anyway, I managed to slug my way through.
I used a variegated thread with blues and purples.  Here's a closeup of the stitching which shows how the thread shows up on the solid border:
And here's the backing and a closeup of the top.  Each of the squares on the top are 4.5" - so yeah, a lot of stitching on this quilt!
As you can see, I bound it in a very deep purple fabric - to help pull up the darker purples in the top.

This project did give me some headaches, but the results are lovely (I do wish my camera captured colours better...).