After pulling my hair out trying to get end-to-end quilting to work on the Bernina Q-Matic, I finally caught on!
The YouTube video I found online was somewhat helpful. It shows two ways of realigning the "safe area" - which you have to do after advancing the quilt on the frame. The method "Reposition on Screen" is pretty straight forward, but has the disadvantage that it's too easy to accidentally shift the area to the left or right while pulling downward - and thereby throwing off the design. "Snap to Point" pretty much allows you to avoid that problem - but the video doesn't show the head being moved into position. Instead, it just shows the computer screen the whole time - and I found it confusing.
I also looked in the printed manual that came with the Q-Matic. Yup - there's written instructions in there on how to do it - but oh, my... the way the pages are laid out on that book (with wierd uses of indentation and bullet points)... VERY difficult to read and make sense out of.
For me, the breakthrough came when I used the "how-to" instructions that are recorded inside the computer itself. Once I selected "Realign Safe Area", I noticed there's a blue circle with a question mark at the bottom/center of the screen. When I selected that circle, a small dropdown window appears with written instructions for both the "...on Screen" and "...on Point" methods. And guess what?!?! The instructions are actually fairly clear!
What a relief!
So OK - I'm off and running now. I've got several quilt tops that are ready to go - and will be powering through my backlog of work in no time!
September 27, 2018
September 26, 2018
Quilt 111: Zoe The Giraffe (and Q-Matic Headache) - DONE!
I mentioned last week I was having trouble with doing end-to-end quilting on the Bernina Q-Matic. Here's an example of what was going on...
Here's the stitch pattern I selected for the quilt from the library that comes with the Q-Matic. As you can see, it's circles which are overlaid, creating an interesting design: "Half Moon Border 03".
 With the Q-Matic, you can select this design and have it repeated on the
quilt, effectively stitching from left to right in rows. As you
advance the quilt on the frame, you have to keep things lined up and
spaced properly - something the Q-Matic is supposed to do automatically
with it's "Re-align Safe Area" function.
With the Q-Matic, you can select this design and have it repeated on the
quilt, effectively stitching from left to right in rows. As you
advance the quilt on the frame, you have to keep things lined up and
spaced properly - something the Q-Matic is supposed to do automatically
with it's "Re-align Safe Area" function.
But I was having trouble with that when I did the quilting on this project.
In the photo below, you can see the result. After the first set of rows, the Q-Matic just wouldn't line up the next rows correctly. Instead of adjusting the Q-Matic's area, I had to get as close as I could and then manually shift the quilt on the frame to match up what the Q-Matic was wanting. It was, frankly, a nightmare. In the photo below you can see the worst-matched row (look in the lower left corner, and you can see the points don't match up as they should).
I'm certainly glad I didn't select a more elaborate design. I managed to do OK with this. I don't think you'd notice the incorrectly aligned rows without me pointing them out, but I certainly have trouble seeing anything else...
Here's the finished quilt. It's made from a single printed panel, with a 3" border of solid tan fabric, and solid dark brown for the binding.
Fortunately it looks just fine. I used gold thread for the quilting, and it fades well into the pattern on the top. And here's the backing. With the patterned backing fabric, you can't see any goofs at all because the green swirls just swallow up the stitching.
 The quilt is fine - just not quite to my usual standards.
And, as I reported last week, I did finally find a video showing how to realign the safe area, and managed to get one of the 2 methods they show to work consistently for me.
I've got another quilt mounted on the Bernina and expect I'll be able to report a very happy success next week!
Here's the stitch pattern I selected for the quilt from the library that comes with the Q-Matic. As you can see, it's circles which are overlaid, creating an interesting design: "Half Moon Border 03".

But I was having trouble with that when I did the quilting on this project.
In the photo below, you can see the result. After the first set of rows, the Q-Matic just wouldn't line up the next rows correctly. Instead of adjusting the Q-Matic's area, I had to get as close as I could and then manually shift the quilt on the frame to match up what the Q-Matic was wanting. It was, frankly, a nightmare. In the photo below you can see the worst-matched row (look in the lower left corner, and you can see the points don't match up as they should).
 |
| (doubleclick any picture on this page to see a larger image) |
Here's the finished quilt. It's made from a single printed panel, with a 3" border of solid tan fabric, and solid dark brown for the binding.
 |
| 40" x 48" - quilted on the longarm (Bernina with Q-Matic) - cotton batting |

And, as I reported last week, I did finally find a video showing how to realign the safe area, and managed to get one of the 2 methods they show to work consistently for me.
I've got another quilt mounted on the Bernina and expect I'll be able to report a very happy success next week!
September 19, 2018
End-to-End Headaches with the Bernina Q-Matic after Advancing the Quilt
No - there's nothing wrong with the machine. It's me.
Shelly, the dealer who sold me the system, is also the one who is teaching me how to use it. One of the first things she showed me was how to do end-to-end quilting with the Q-Matic, and keep the rows lined up properly.
Well... it's just a little tricky and my brain didn't absorb the lesson well. I had to ask her to show me again, which she did, but again I just didn't get it.
I hate to have to confess to her that I need yet a 3rd go and learning this - but thankfully I found a video on YouTube which shows how to tell the Q-Matic that the quilt has been advanced on the frame, and the starting point for the next row needs to be calculated.
Here's a link to the video: "BERNINA Q-matic Video Tutorial: Realign Safe Area"
So I played with it... and I can do the "adjust on screen", but "snap to point" isn't working. Oh well... at least one of them works....
Stay tuned...
September 12, 2018
No Post this Week
I've been a little under the weather and have gotten behind on my quilting - so there's not much to post about this week.
Hopefully next week will be better!
Stay tuned!
Hopefully next week will be better!
Stay tuned!
September 5, 2018
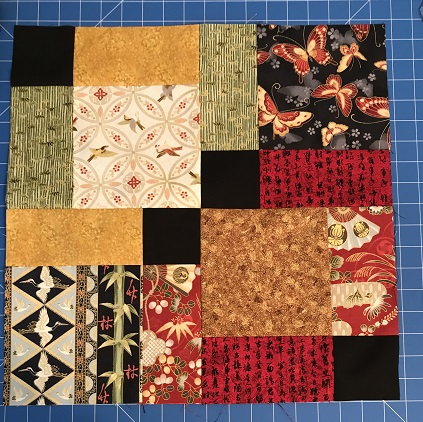
Quilt 110: "Oriental Traditions" Kit (Disappearing 9-Patch) - DONE!
This project came together beautifully.
After auditioning the threads for quitling, I opted for a gold thread, as it would fade into the background on most of hte prints in this quilt.
The kit designer instructions included the recommendation to place the fabrics randomly - but instead I opted to make them uniform. So if you look at the cream colour prints, you'll notice they are all in the same relative position as the gold/brown positioned diagonally from them.
Here's one completed block:

And here is the finished quilt:
I did this, feeling a more "organized" quilt than the designer intended
would look just fine and would be less bothersome to make than "random"
placement of the fabrics (which means having to worry about having 2 of the same fabrics end up side by side).
The backing and binding are solid black homespun. Here's the backing with my free-motion quilting stitches in gold:
I thoroughly enjoyed making this quilt, and will definitely do another "disappearing 9-patch" quilt using some different prints!
After auditioning the threads for quitling, I opted for a gold thread, as it would fade into the background on most of hte prints in this quilt.
The kit designer instructions included the recommendation to place the fabrics randomly - but instead I opted to make them uniform. So if you look at the cream colour prints, you'll notice they are all in the same relative position as the gold/brown positioned diagonally from them.
Here's one completed block:
And here is the finished quilt:
 |
| (51" x 68" - quilted on the longarm free-motion nested "C"'s - cotton batting) |
The backing and binding are solid black homespun. Here's the backing with my free-motion quilting stitches in gold:
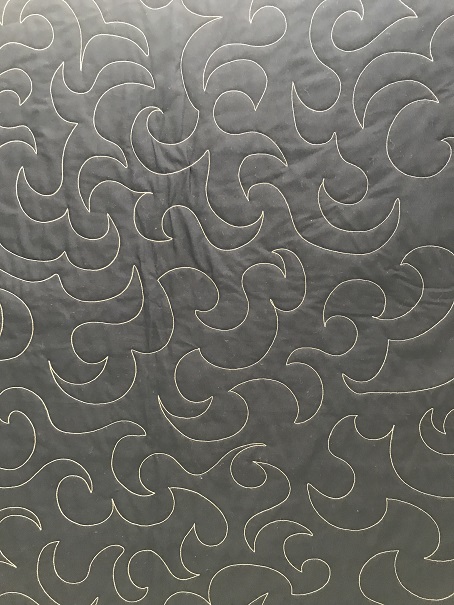 | |||
| (I do wish my camera captured colours better - this backing is superb in real life) |
Subscribe to:
Posts (Atom)
